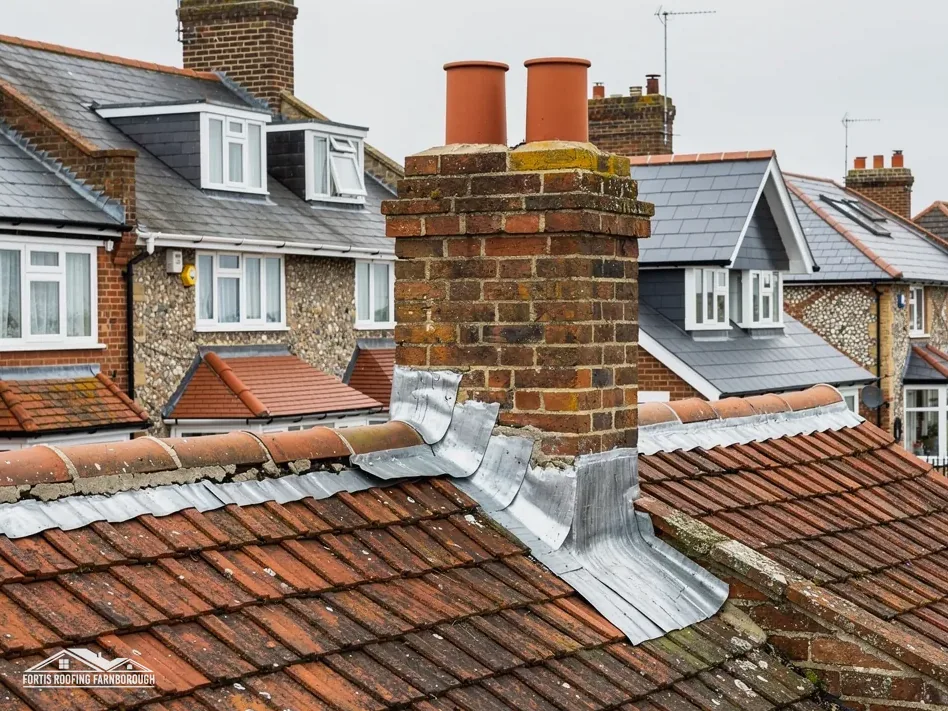
Chimney flashing is the strip of waterproof metal, nearly always lead, that closes the gap where a brick stack comes up through the roof. Bricks and tiles move at different rates in the weather, so the joint between them cannot be filled with mortar and left. The lead is dressed over the tiles on one side and tucked into the brickwork on the other, so it flexes and keeps rain out.
A flashing is not a single piece. On a stack in the middle of a slope, it is built from four parts: an apron at the front, stepped flashings and soakers on each side, and a back gutter behind the stack on the uphill side. Each part catches water from a different direction, and each can fail alone.
That is why a chimney can leak while the lead looks fine from the garden. This guide explains what each part is and does, how thick the lead should be and what the code numbers mean, what failure looks like, and what national guides say about cost. It also points to our lead work pages for the details of repair and replacement, because chimney flashing is one of the most common leadwork jobs we are asked to survey.
The four parts of a chimney's lead
Think of the stack as a box standing on a slope. Water runs down the slope from above, along both sides, and off the front. Each face of the box needs its own answer.
Back gutter
On the uphill side, water running down the roof meets the stack head on. A back gutter, sometimes called a back tray or saddle, is a channel in lead behind the stack. It collects the water and sends it round both sides.
Side flashings and soakers
On each side, the roof tiles or slates rise to meet the brick. A soaker is a rectangle of lead laid in with each course of tiles, one leg under the tile and the other turned up the brick. A flashing then runs above the turned-up legs, tucked into a groove cut in the brickwork, called a chase. The pair work together.
Front apron
At the downhill face, an apron is a single piece of lead that lies over the tiles below the stack and turns up against the brick. It is covered at the top by a flashing set into the wall.
Why separate pieces
A roof expands, contracts and settles. Lead cut as one piece would split. Several pieces, lapped correctly, let each part move without breaking the seal. Our answer on a chimney back gutter covers that part in more detail, and the lead roofing and lead work page shows the wider range of leadwork we undertake.
Aprons and cover flashings
The apron is the part you see first from the front of the house, and it is the simplest of the four to understand.
How an apron is laid
A sheet of lead is dressed over the tiles immediately below the front of the stack. It extends up the brick by a few centimetres, and its lower edge lies over the tile surface, shaped to follow the tile profile so water runs off rather than under. Where the tile is a bold profile, such as a Double Roman, the lead is dressed carefully into the troughs.
The cover flashing
The top edge of an apron is not left loose. A separate strip of lead, set into a cut in the mortar joint and wedged with lead wedges, sits above it. This is the cover flashing, sometimes called a counter-flashing. It stops rain running down the face of the brick and behind the apron.
What goes wrong
Mortar in the chase shrinks and falls away, and the cover flashing comes loose. A sealant smear over a gap is a quick fix that fails. Lead can also be damaged by the sort of acid in some mortars, or by being left unsupported so that it slumps over many winters.
Fixing it properly
A proper repair opens the joint, re-fixes the lead with wedges and repoints in a suitable mortar. Our guide to lead flashing repair covers the process in detail, and our guide to sealant on lead flashing explains why a bead of mastic is not a lasting fix. Done well, the flashing is a once-in-decades job rather than an annual one.
Soakers, step flashings and the sides
The sides of a stack are the hardest places to seal, because the brick runs at an angle to the slope of the tiles.
The soaker method
On a tiled roof, each course gets its own L-shaped soaker, so water passes from one soaker to the next and out onto the tile surface instead of into the roof. The flashing above covers the turned-up leg.
Stepped flashings
Where a slope meets a brick wall, the cover flashing is cut into a stepped pattern. Each step is tucked into its own mortar joint and follows the line of the roof. A single long strip would not follow the slope, so it is cut in steps. Our guide to step flashing shows what the stepping looks like on a wall, and why a straight strip cannot follow a sloping roof.
Slate roofs
On slate, soakers are normally used in the same way. The lead is thin enough to fit between slates without lifting them. Royston's brochure lists code 3 lead as suitable for soakers only, with codes 4 and above used for a wider range of leadwork.
Why side leaks are common
The side flashing is cut into the brickwork, and mortar that has weathered gives the lead nothing to hold it. Water then tracks behind it. A damp patch on the ceiling next to a chimney breast is often a side flashing, not the roof itself.
A tell-tale
Lead that has lifted off the brick, or a gap you can see daylight through, is a sign. So is a lead strip that has slid down the wall under its own weight, because lead creeps slowly on a vertical face. Check these from the garden with binoculars, and note the date.
The back gutter behind the stack
The back gutter is the part of the flashing that does the most work and is seen the least, since it sits on the uphill side where you cannot see it from the ground.
What it does
All the water that runs down the slope above the stack is diverted around it, and the back gutter is the channel that carries it. In a heavy downpour, a good amount of water arrives behind the chimney in seconds. The gutter has to be wide enough and the right depth, and it needs a fall so that water drains away to each side.
Lead and fall
The lead is dressed up the face of the brick, across the back of the stack and down to the sides, and the gutter is formed with a slope towards the corners. It is covered at the top by a flashing set into the brick. If the fall is wrong, water pools and leaks through the seams.
Debris and moss
Leaves, moss and bird droppings collect in a back gutter and block it. When it is blocked, water backs up and overflows into the roof. Cleaning it is part of regular maintenance, though reaching it needs a ladder or tower.
Why it fails
The lead splits where it has been folded repeatedly. Fixings fail, and the lead can creep down. A small crack in the back gutter shows up as a leak in the loft by the chimney, often only in heavy rain.
When we survey a chimney, we photograph the back gutter from above and show you the lead as it stands.
Lead codes and what the numbers mean
Lead sheet is sold by code number, which stands for thickness and weight. The higher the code, the thicker the sheet. Each code also has a colour, used to mark it in the yard.
| Code | Thickness | Weight | Colour |
|---|---|---|---|
| 3 | 1.32 mm | 14.97 kg/m² | Green |
| 4 | 1.80 mm | 20.41 kg/m² | Blue |
| 5 | 2.24 mm | 25.40 kg/m² | Red |
| 6 | 2.65 mm | 30.05 kg/m² | Black |
Which code for which part
The Royston brochure lists code 3 for soakers only, code 4 for soakers and flashings, and codes 5 and 6 for flashings, along with heavier work. For a chimney, the brochure's flashing codes start at 4 and run up through 5 and 6, so the choice depends on exposure and on how the lead is fixed into the masonry. A back gutter is chosen from the codes the brochure lists for gutters, and we give the reasoning on the survey.
The standard behind it
Approved Document C refers to BS 6915:2001 for recommendations on lead. That is the standard for lead sheet roofing and cladding. BS 6229, which covers flat roofs with flexible coverings, does not apply to lead.
How long it lasts
MyJobQuote's page on chimney leadwork gives lead flashing a life of over 80 years, a minimum figure and not a promise. How long a particular flashing lasts depends on the code, the fixing and the mortar around it. See our post on what lead flashing costs for more.
We name the code on the survey and explain why we chose it, so you can compare like with like if you ask a second roofer. A thicker code costs more per square metre, though the extra lead is a small part of a job where access and labour usually dominate.
Signs of failure and what leadwork costs
A chimney flashing seldom fails all at once. A leak usually starts small and shows a pattern.
Signs from the ground and the loft
- Brown stains on the ceiling or wall next to the chimney breast, often darker after rain.
- Lead that has lifted, folded back or slid down the brickwork.
- Gaps or crumbling mortar in the joints above the lead.
- Daylight round the stack seen from the loft, or damp timbers beside it.
- Sealant smeared over old lead, which is a sign of a previous quick fix.
Why diagnosis matters
Damp near a chimney has several causes: flashing, flaunching, pointing, the pot and condensation. Replacing the wrong part wastes money. We check each from the roof and photograph the result.
What the national guides say
MyJobQuote puts a full chimney leadwork replacement at between £350 and £920, depending on how much access is needed and whether scaffolding is required (Sep 2026, typical UK range). That is a national figure, not a Fortis price.
What decides the cost
The size of the stack, the number of faces, the code of lead, the state of the mortar and the access are the main factors, and condition matters most of all: a flashing that can be re-fixed costs less than one that has to be replaced. Scaffold or a tower is often the largest single item for work at height. Once we have surveyed and photographed the stack, one written price follows.
Related guidance
Our chimney repairs page lists the other chimney jobs we survey, from flaunching to rebuilds.